
Understanding the Science Behind Choux Pastry
From ingredient deep-dive, to the science behind every step of the recipe, and even a three-recipe comparison, this guide has everything you need to know to become a master of choux pastry.

If there were an award for the most wrongfully feared dessert recipes, Choux pastry would most likely be at the top of the list. Sure, it’s not as simple to make as cakes, cookies, or brownies, but it’s not even close to being as difficult as people perceive it to be.
And don’t get me wrong, I was one of those people, too. Until I ACTUALLY understood the recipe.
Welcome to Ayesha’s Pastry School, which (obviously) isn’t a real pastry school, but just a space where a girl (me) who is obsessed with baking but cannot go to pastry school learns about and tests recipes for classic pastries and bakes and shares her research, learnings, and findings here, because what’s fun about learning alone?
This month, I decided to go into the depths of understanding choux pastry. I’ve made choux pastry many times before with a reliable recipe, but often, the recipe would fail, and I could not understand why.
So when I decided to learn about classic pastries in depth, I knew I had to start with choux pastry because I was tired of getting different results every time.
Here’s everything I’ve learned about choux pastry that will help you better understand the process and nail the recipe every time.
My approach
Here’s how I go about my research and testing.
Understand the pastry: history, applications, important aspects, and pain points.
Ingredients: understand the function of each ingredient in the recipe.
The science: the most important step - thoroughly understand the science behind the recipe and how each step of the process helps in creating the final result.
Recipe test: if I have an existing recipe, I will test it on the basis of my research and figure out if any changes can be made to improve it further.
Recipe comparison: test out 2-3 recipes from well-known chefs or sources with slight differences to compare them and figure out which one leads to the best result, and understand why.
What is Choux Pastry
Choux pastry is a classic French pastry dough used to make different desserts, including profiteroles, cream buns, eclairs, and Paris-Brest.
It’s known for its crisp outer shell and completely hollow center that can be filled with a variety of fillings, and is made with seven simple ingredients - milk, water, butter, sugar, salt, flour, and eggs.
The pastry itself has a neutral flavor and can be used in both sweet and savory applications. It’s more commonly used in desserts and filled with pastry or whipped cream, but can also be filled with savory flavors.
Choux pastry’s most discerning feature is that it’s cooked twice - once on the stove, and once in the oven. The initial dough, called the panade, is made by cooking milk, water, sugar, salt, butter, and flour over the stove, then mixed with the eggs and baked in the oven for the final result.
It also does not use any leavening agent (like baking powder or soda), but relies solely on the steam created from the moisture in the dough while baking to help it rise and get its classic hollow center.
Choux Pastry Ingredients
Choux pastry uses a simple list of ingredients - milk, water, sugar, salt, butter, flour, and eggs. Some recipes use only milk and no water, but most of the recipes use both.
Here’s a breakdown of the function of each ingredient in this recipe.
Water (or Water + Milk)
Water is one of the most important ingredients in choux pastry because it’s responsible for the dough’s rise in the oven. As I mentioned before, choux pastry doesn’t use any raising agents, and depends solely on steam for leavening, which is created when the moisture from the dough is evaporated due to the heat in the oven while baking, expanding the dough and creating the signature hollow center.
Most recipes also include milk as part of the dough’s liquid ratio, which adds richness and encourages browning due to its natural fat and sugars, but milk can slightly soften the crust due to its fat and sugar content, so be wary of how much you add to your recipe.
Butter
Butter is made up of two main components - fat and water, and both play an important role in choux pastry. The main function of butter in any recipe is to provide fat (as it is 80% fat). And in choux pastry, the fat provides both richness and flavor, and aids in tenderness.
The water in butter also adds moisture, which, combined with the moisture from the milk, water, and eggs, helps the dough rise while baking. However, adding too much butter to a choux pastry recipe will increase the fat % and may lead to a crust that’s softer than it should be, and it may even collapse.
Salt & Sugar
Both salt and sugar are added in very minimal quantities to choux dough, only to season it so that it does not taste bland. It’s recommended to add both salt and sugar to the dough, whether you plan to use it in a sweet or savory application, as neither is added in a big enough quantity to make it sweet or salty.
Flour
Flour is the backbone of choux dough, giving it structure and body.
Flour is mainly made of two components: protein and starch. Usually, protein is the star of the show as it forms gluten in a dough when mixed with water; however, in this case, the starch in flour plays the most important role
When starch is mixed with water and heated (as it is done on the stovetop while making the dough), it absorbs and traps the water molecules within, which is called starch gelatinization.
Initially, this process just thickens the dough (think of what happens when you add cornstarch slurry to a sauce or curry). But as the dough is heated further, the starch and water bonds get stronger, making the dough stronger.
As they are continuously heated at a high temperature in the oven, the starch and water bonds continue to become stronger, which makes the dough strong enough to be able to rise as the steam is created within the dough without popping.
Eventually, the heat strengthens them enough to completely set and harden at the risen position, so that even after the steam is released, the choux pastry will hold its shape.
This is why it’s extremely important to bake the pastry until it has properly set and dried, or it will collapse as soon as you take it out of the oven and the steam is released.
Typically, choux pastry recipes use all-purpose flour. But some recipes use bread flour, which has a higher protein % and results in more gluten formation, a stronger shell, and a better rise.
Eggs
Eggs are one of the most multifunctional ingredients in choux pastry. They add moisture (which helps create steam for leavening along with the other ingredients), helps emulsify (i.e, mix) the dough, and most importantly, they provide structure.
As the dough bakes, egg proteins set and firm up, helping the pastry keep its puffed-up shape and form a golden, slightly crisp shell. The egg yolks also add fat and richness, while the whites contribute to the rise and structure.
Below are the measurements for my recipe. However, this technique can be used for any choux pastry recipe.
100 ml full-fat milk
100 ml water
2 grams sugar
2 grams salt
90 grams butter
100 grams all-purpose flour
200 grams eggs
Equipment List
It’s quite simple to make choux pastry at home with minimal tools. Here’s everything you need.
Heavy-bottomed pan, ideally not non-stick.
Silicone spatula or wooden spoon
Baking tray lined with baking paper.
Piping bag, or ziplock bags
You can also use a stand mixer for mixing the eggs, but it’s not necessary.
The Science behind Choux Pastry
While the recipe for choux pastry is simple, there is quite a lot of science involved behind getting it right. Once you understand these aspects, it will be easy for you to make the recipe correctly and troubleshoot if something goes wrong.
So let’s go through the choux pastry recipe and look into the science behind each step.
PS: If you would like a video version of this explanation, you can find it here.
Step 1: Cooking the liquid, butter, sugar, and salt
The recipe starts with the first cook. Add the water, milk, butter, sugar, and salt into a heavy-bottomed saucepan (ideally not a non-stick) and place it on medium heat and cook, mixing often.
As it cooks, the butter will melt and blend with the liquid, while the sugar and salt will dissolve. Once the mixture comes to a simmer, you're ready to move on.
This first step does a few things. The heat melts the butter, dispersing the fat evenly, and the boiling ensures that the liquid is hot enough to cook the flour in the next step.
Step 2: Adding the flour and creating the panade
Once the mixture is ready, take it off the heat and add the sifted flour all at once, and mix vigorously until a thick paste forms. This paste is called the panade. Be sure to mix the flour immediately to prevent lumps from forming in the dough.
Why sift the flour?
Sifting the flour, especially if you’re using bread flour, makes sure that the flour is fine enough to mix properly and not form lumps in the dough.
Step 3: Drying the dough
After the flour is added, the panade is cooked for a couple more minutes on low heat. The purpose of this step is to cook out the flour and encourage starch gelatinization, and to reduce moisture from the dough.
Once the paste is smooth and even, spread it evenly in the pan and let it cook until you start to hear a sizzling sound.
You’ll also notice a film forming at the bottom of the pan—that’s a good sign. It means excess moisture is evaporating, and the dough is drying out a bit, which is exactly what we want. After this, take the dough off the heat.
This step is crucial. If you don’t cook it long enough, the dough will be too wet, and the choux might spread out instead of rising in the oven.
Step 4: Adding the eggs
The panade needs to cool down slightly before you start adding the eggs. Why? Because if the dough is too hot, it can cook the eggs, and you’ll end up with scrambled egg dough—not ideal.
This is an important step, as most people mess up their choux pastry right here.
Every recipe will give you a certain amount of eggs to add to the dough, mostly measured in grams (as each egg measures differently, and even a 10-15-gram difference can significantly affect the dough).
However, there is no way to know exactly how much egg your dough needs, as it depends on how much moisture was dried out from the panade while cooking it.
As we discussed before, eggs add moisture to the dough. If there is too much moisture in the dough, it will not be able to rise properly while baking and will most likely collapse due to a lack of structure.
So, we want to make sure that we are adding JUST the right amount of eggs into the dough to create the perfect, thick, pipeable consistency with the right amount of moisture. And for that, you may not need the entire amount of egg mentioned in the recipe.
Whisk the eggs properly in a separate bowl, and once the panade has cooled down, start adding them a little at a time, mixing well after each addition.
When you get to the last third of the eggs, add in just a small amount at a time until you reach the right consistency.
How do I know when I have reached the right consistency?
The dough should be thick, but still slightly wet. Remember, it has to be pipeable. The best way to test it is to lift some of the dough with your spatula or spoon and let it drizzle down. The dough should drizzle down once, then leave a hanging V shape on the spatula.
If the dough is not drizzling down at all, you need to add more eggs. If the dough is not leaving a V shape, but is drizzling down even more, then it is too wet.
I highly recommend taking your time with this step, as you can always add more egg, but if the dough has become too wet, there is nothing you can do to fix it.
Step 5: Piping the dough
Once the dough is at the right consistency, transfer it into a piping bag, remove the air bubbles as much as possible, and cut a 1/2 inch opening. Line a baking tray with baking paper.
I am sharing the instructions for baking choux buns, but the same recipe can be piped differently for making eclairs or Paris-Brest.
I recommend using a round-shaped cutter or bottle lid to create a template on the baking paper, as this will help you get consistent sizes for your choux buns. Don’t forget to turn the paper upside down, or the pen/pencil mark will transfer onto the dough. Leave a generous gap between each bun as they will expand while baking.
How to pipe a choux bun.
Hold the piping bag at a slight angle and place the open tip at the center edge of the circle template.
Do not move the piping bag at all, just press the bag to pipe a consistent, high dollop of the dough. If you move the piping bag, the dough will form layers and not rise properly.
After piping, gently brush each dollop of dough with egg wash without squishing them.
Adding the craquelin
The craquelin is a simple dough that is placed over the choux buns before baking. It’s not necessary, but it gives the choux buns a nice shape and a crispy shell.
To make the craquelin, mix sugar, butter, and flour until it forms a dough, roll it thinly between two pieces of baking paper, let it set completely in the fridge, then cut out circles using the same-sized circle that you used for creating your choux pastry template. Place each circle on the choux dough.
Step 6: Baking the choux buns
Before baking, the oven has to be preheated to a high temperature (230 degrees Celsius). This high temperature aids in creating the steam and helps the buns rise properly.
As soon as you place the choux buns into the oven, reduce the temperature to a range of 200-180 degrees Celsius*.
As the choux dough hits the heat of the oven, all the moisture trapped inside (from the water, butter, and eggs) turns to steam.
The dough doesn’t burst or collapse from the steam. Why?
Because the starch gelatinization from earlier gives the dough enough structure to expand without tearing.
As we discussed, once the pastry has fully risen and is golden brown, the heat sets the structure in place. The steam eventually escapes, but the shape stays puffed. It’s like the dough sets in mid-rise and locks into that hollow shape.
*Why a range and not a particular temperature?
I recommend a range and not a particular temperature here, as every oven functions differently. My oven is not able to manage the sudden drop from 230 degrees to 180 degrees, and it keeps switching off, which doesn’t allow my choux buns to bake properly.
Due to this, I drop the temperature to 200 degrees when I place the pastry in the oven, then let it bake undisturbed for at least 20 minutes, and reduce the temperature by 10-15 degrees for the remaining bake.
The most important thing is to let the buns bake at the same temperature, undisturbed, without opening the oven door. Any changes in heat may cause the buns to collapse.
If you take the choux out too early, before the structure sets, the steam can escape too soon and cause the pastry to collapse—so that deep golden color isn't just pretty, it's important.
All of these choux buns were made with the same dough, but the ones on the right were not baked enough, while the ones on the left were baked enough.
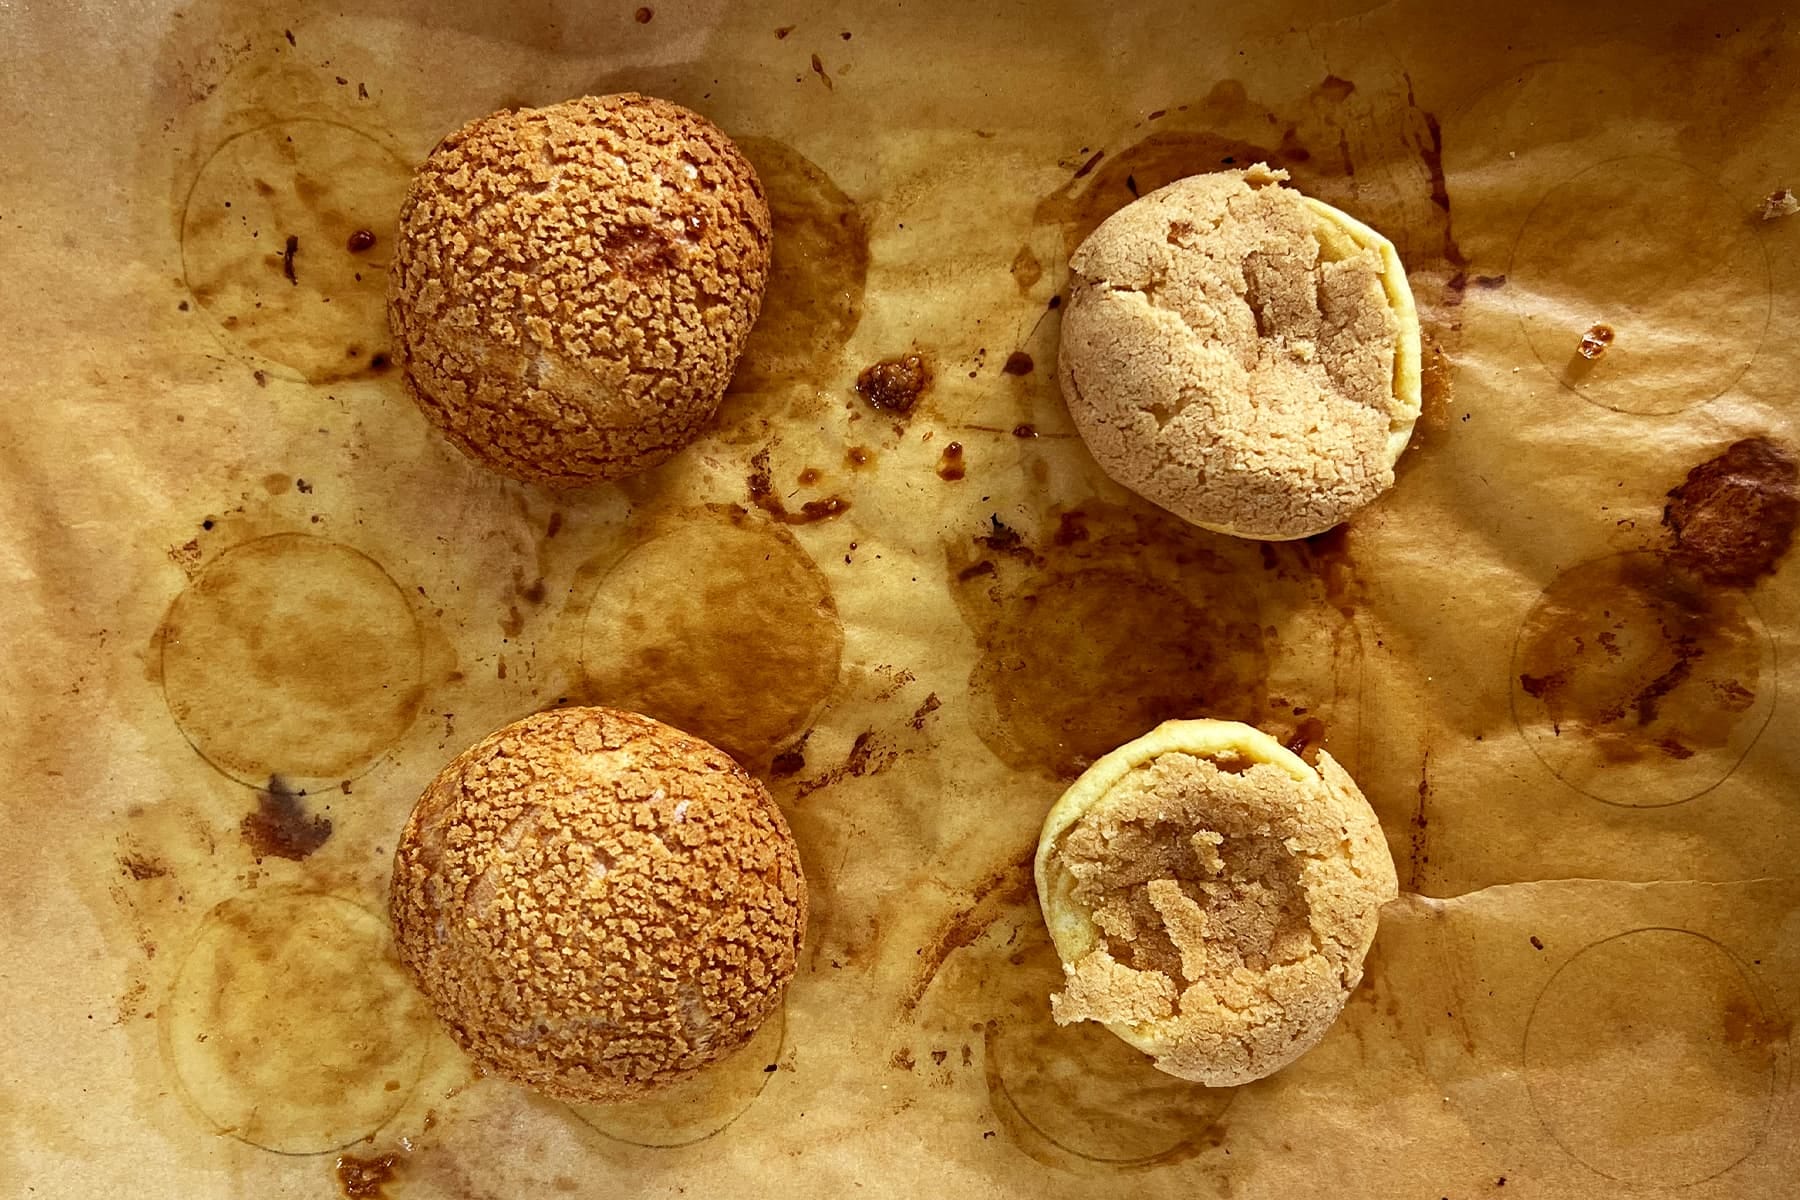
It takes approximately 30 minutes in my oven, but it might take more or less in yours.
Once the buns have baked, take them out and let them cool completely before filling.
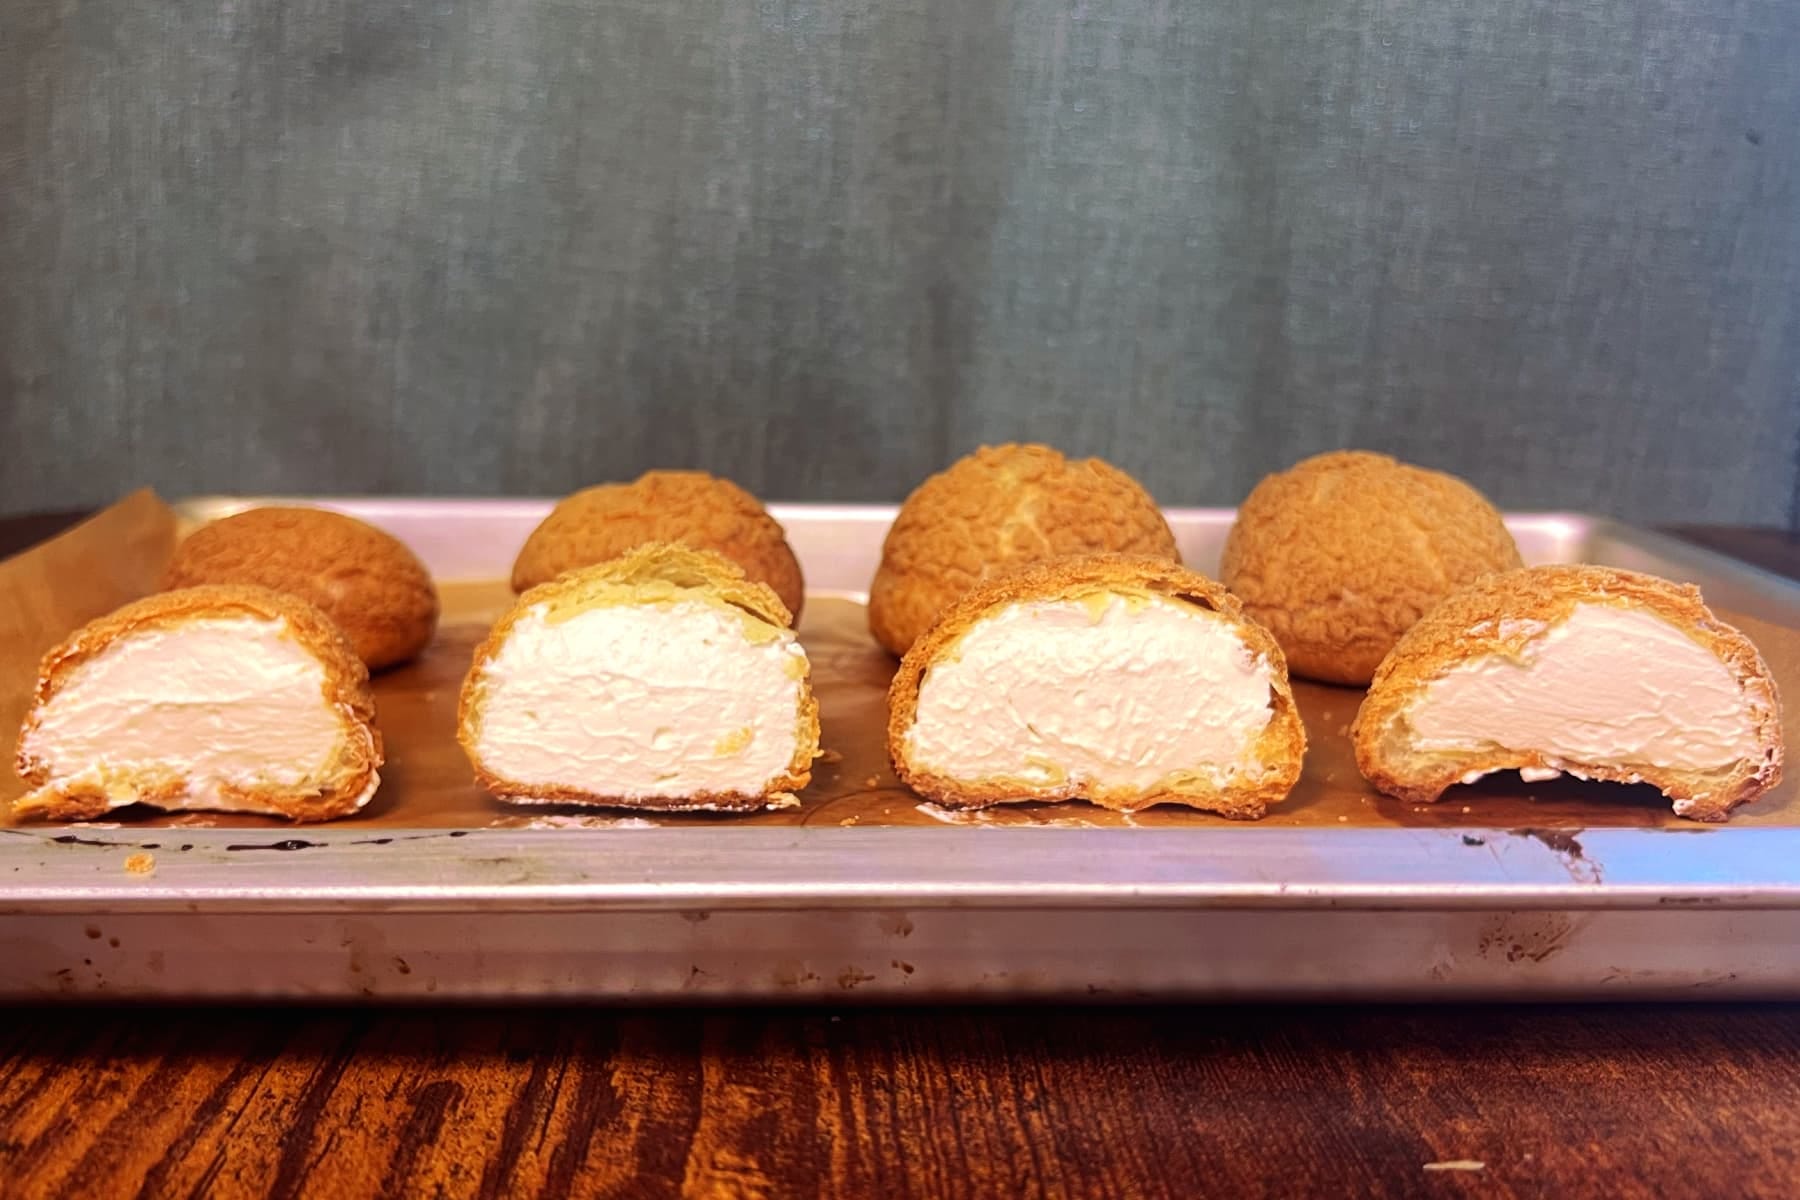
Step 7: Filling the choux buns
Choux buns can be filled with many different things, but pastry cream and whipped cream are some of the most common fillings. As long as the filling can hold its shape, it can be piped inside a choux pastry.
To fill a choux bun, make a small hole in the center of the base with a knife. Insert the piping bag into the hole and fill the bun. Be careful not to overfill, or it will ooze out from the top.
Key Points to Remember
Choux pastry is cooked twice – first on the stovetop (to form a panade) and then in the oven (to create the puff).
Use a heavy-bottomed saucepan (avoid non-stick) for better heat distribution and dough development.
Boil the liquid before adding the flour so it’s hot enough to start gelatinizing the starch.
Sift the flour to avoid lumps and make it easier to mix evenly into the hot liquid.
Dry the dough well over low heat until you hear it sizzle and see a thin film on the pan – this step controls the moisture.
Cool the dough before adding eggs so they don’t scramble.
Add eggs gradually, and stop when the dough reaches the right consistency (glossy, pipeable, and leaves a hanging V from the spatula).
Pipe tall, even dollops for good rise and shape – don’t swirl or layer the dough.
Craquelin is optional, but it adds a crisp shell and helps buns hold a round shape.
Preheat your oven to 230°C, then reduce the temperature once the choux is in – bake undisturbed until deep golden brown.
Never open the oven mid-bake or remove the choux too early, or they’ll collapse.
Troubleshooting Choux Pastry

Recipe Comparison
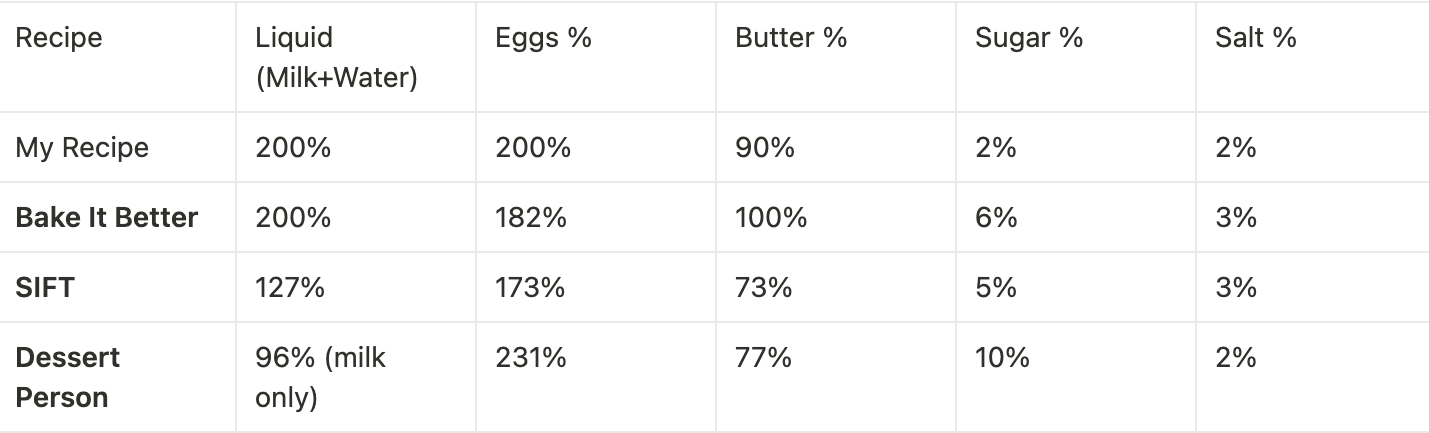
To better understand how these ingredients interact with each other and which combination gives us the best results, I tested out three choux pastry recipes from renowned chefs.
Let’s take a look at how each of these choux pastry recipes differs in terms of ingredients and formulation. While all four follow the same basic method, small changes in ratios — especially liquid, fat, and eggs — can make a big difference in how the pastry behaves.
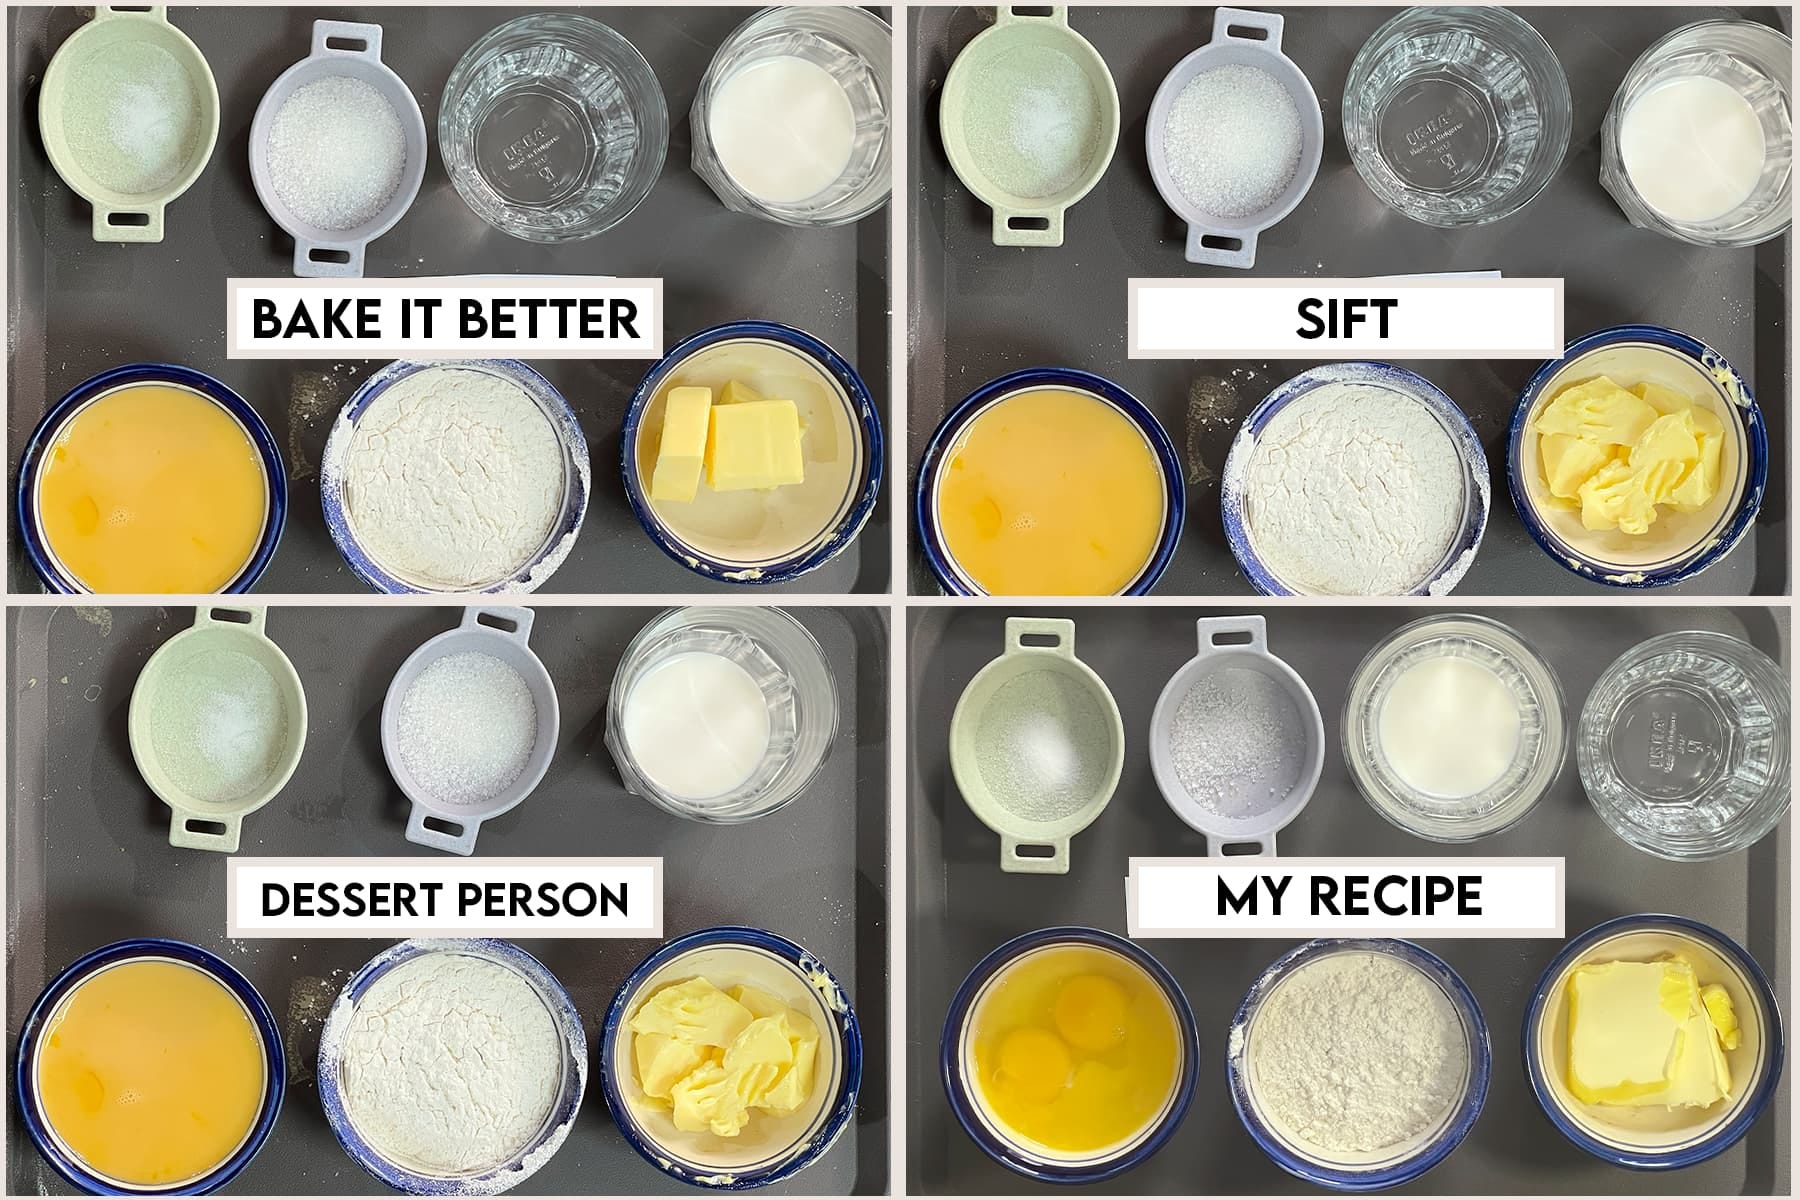
Matt Adlard - Bake It Better
Uses a combination of water and milk
Butter and flour are used in nearly equal amounts
Uses bread flour over all-purpose flour
Eggs are used in a moderate quantity
Nicola Lamb - SIFT
Uses a smaller amount of liquid overall
Butter and flour are both lower than in the other recipes.
Recommends bread flour over all-purpose flour.
Egg quantity is also lower, making this the least enriched dough of the three.
Claire Saffitz - Dessert Person
Uses milk only for the liquid, with no water at all.
Higher butter-to-flour ratio.
Sugar is relatively high, while salt remains standard.
Significantly more eggs than the other recipes.
Ingredient Comparison
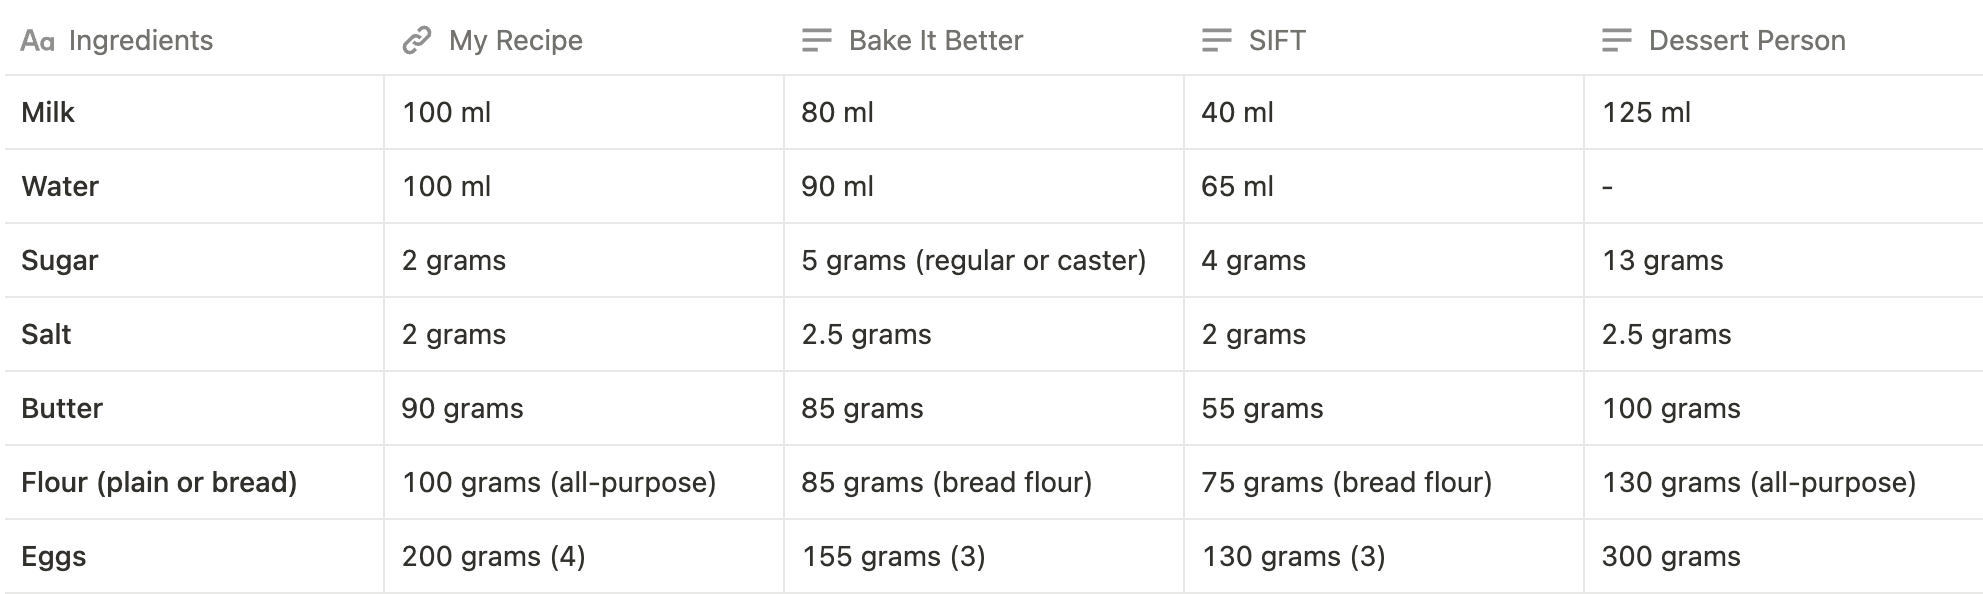
Ingredient Ratios (as % of flour)
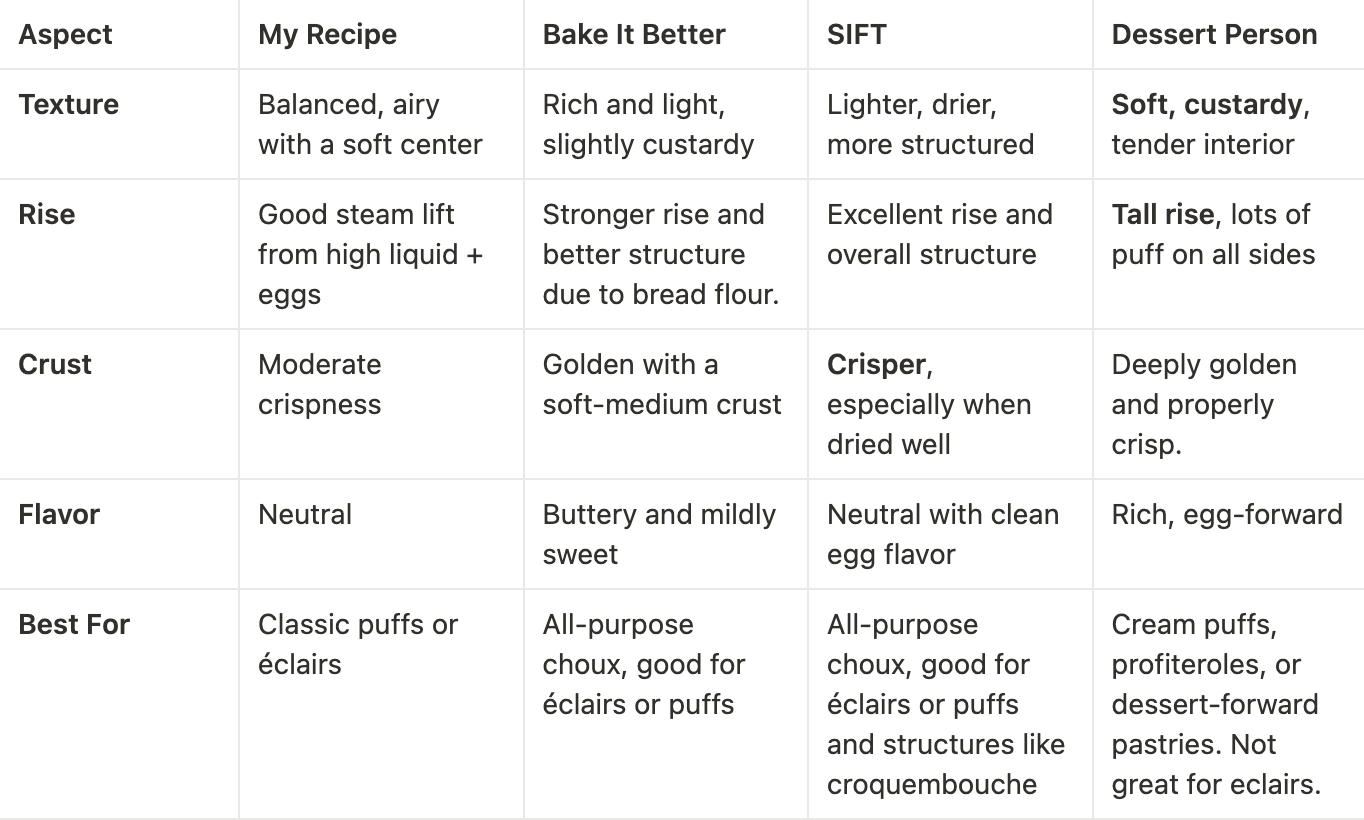
Results
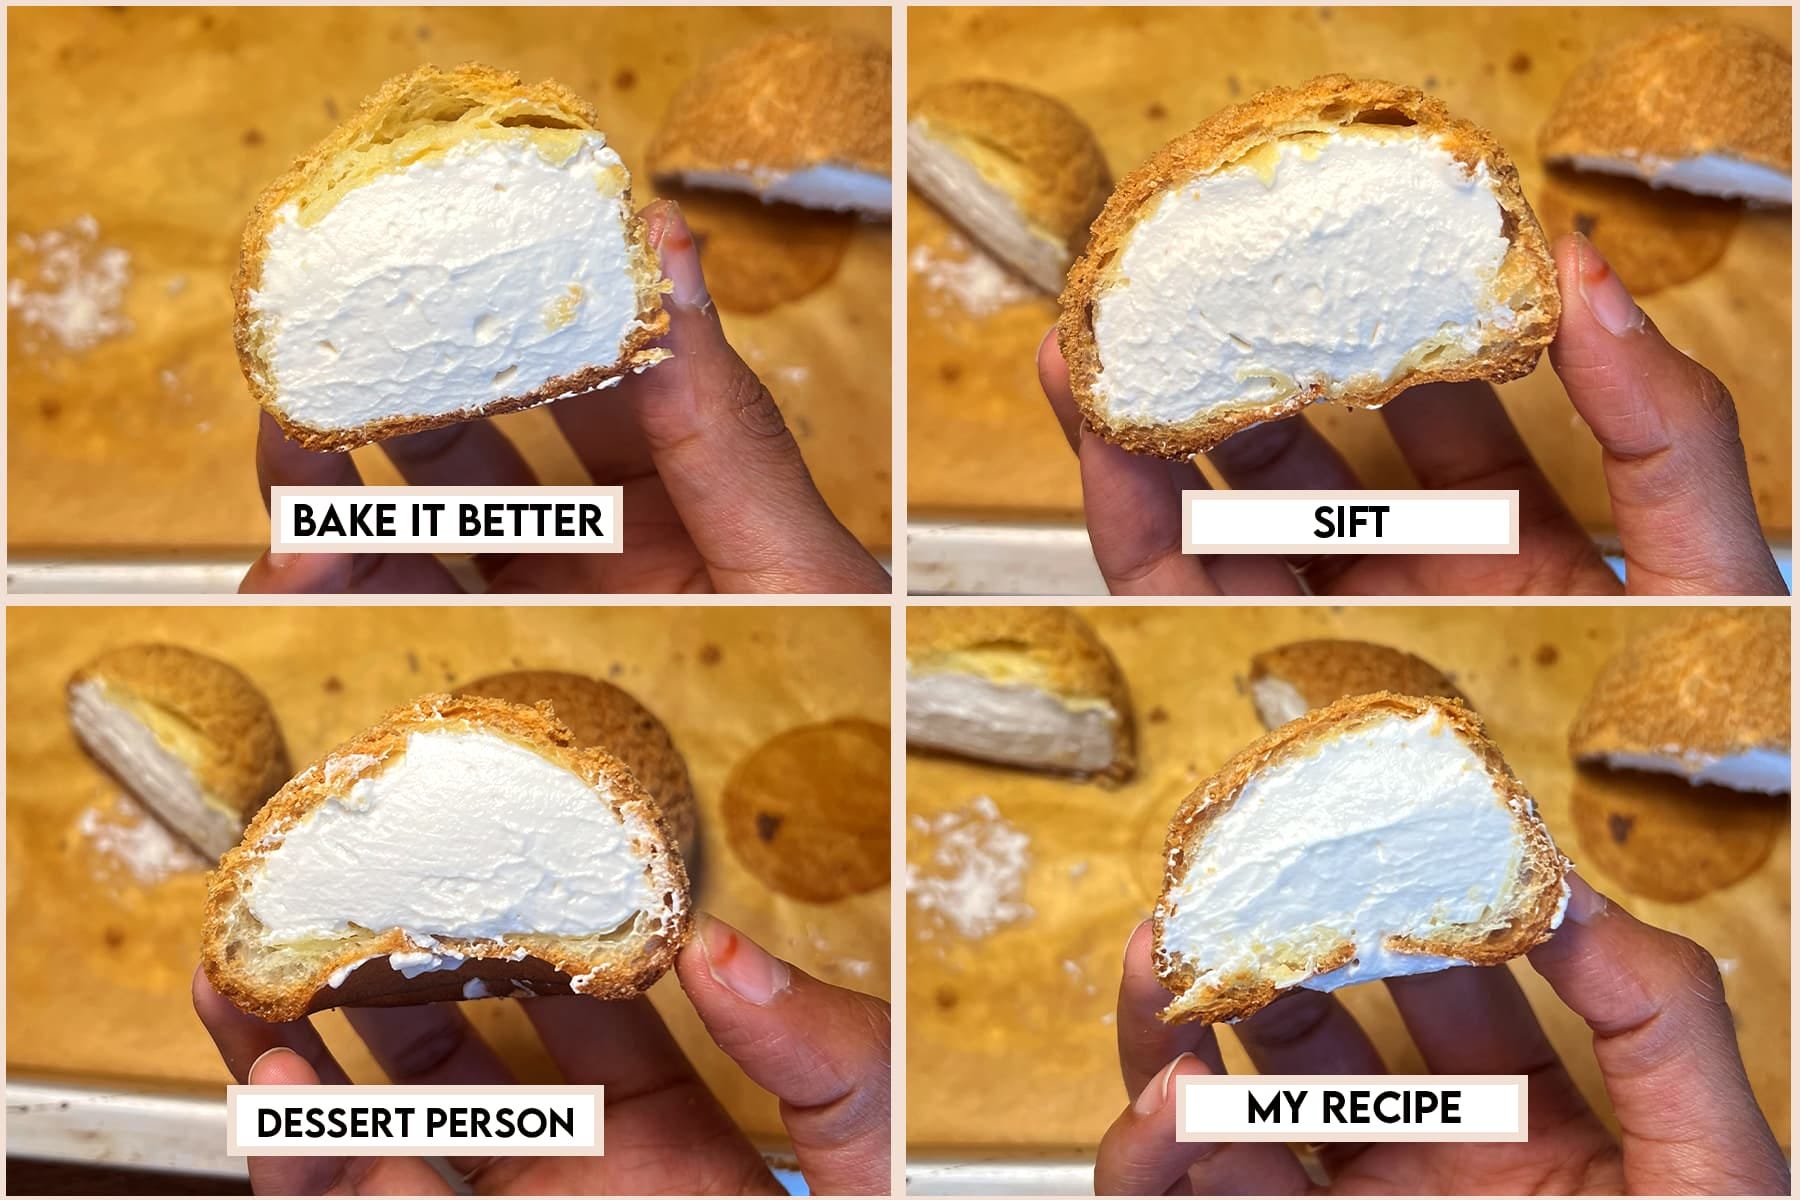
My Recipe: Your most classic French-style choux — equal milk/water = balanced texture, good puff, slightly crisp exterior. A safe, versatile base. The rise can be better with bread flour.
Bake It Better: Similar to my base recipe but with more sugar and butter. Slightly richer and more tender inside. Rises better and has more structure due to bread flour. Great for desserts, but with a bit softer crust.
SIFT: Lower hydration and fat — results in a firmer, drier choux shell. Ideal for recipes where a crisp shell is key.
Dessert Person: Egg-heavy, milk-only, and sweet — gives you puffy, deeply golden, custardy buns. Rises on all sides, not just in height. Great for dessert-style puffs, but needs full baking to avoid collapsing.
Final Thoughts: What Testing Taught Me About Choux
After breaking down the science and testing multiple choux pastry recipes side by side, one thing is clear — small changes in ingredient ratios make a big difference. From water-to-milk ratios to butter and egg content, each recipe builds a slightly different dough that behaves in its own unique way.
Some produced taller, crispier buns; others gave softer interiors or more controlled rise. Understanding how each component—liquid, flour, fat, and eggs—affects the structure and performance of the dough helped me pinpoint exactly what worked and why.
At the end of the day, choux pastry is less about following one perfect recipe and more about learning how to read the dough. Once you know the science, you can adjust based on your oven, your ingredients, and the kind of choux you want to create—whether it's light and airy cream puffs or neatly structured éclairs.
If you’ve made it this far, I hope this deep dive gives you the tools to troubleshoot confidently and bake your best choux yet.